
How to Set Up Two-Factor Authentication and Recover Your Apple Account
Your Apple Account holds your photos, messages, backups, and the keys to your other logins. If someone gets into it, they get all of that. Two-factor authentication is the single best thing you can do to stop that, and Apple turns it on by default for most accounts now. But there is a catch nobody warns you about: the same security that locks attackers out can lock you out too. This guide walks through turning 2FA on, keeping your trusted numbers and devices tidy, and setting up the two backstops Apple offers, a Recovery Key and a Recovery Contact. It also covers the one mistake that can lock you out of your account for good, and how to avoid it.
Check that two-factor authentication is already on
Most Apple Accounts created in the last several years already use two-factor authentication. It is worth confirming rather than assuming. On your iPhone, open Settings, tap your name at the top, then tap Sign-In & Security. If you see Two-Factor Authentication listed as On, you are set. If it shows an option to turn it on, tap it and follow the prompts.
Two-factor works like this. When you sign in on a new device or browser, Apple asks for your password and a six-digit verification code. The code shows up automatically on a device you already trust, or it gets sent to a phone number you have registered. A password alone is no longer enough to get in, which is the whole point.
One thing to know: once two-factor has been on for a couple of weeks, you usually cannot switch it back off. Apple locked that door on purpose. So treat the setup steps below as your one real chance to get the safety net right.
Manage your trusted phone numbers
A trusted phone number is where Apple sends a code by text or automated call when you cannot get one on a device. You need at least one. Keeping a second one on file is smart, because if you lose your only number, recovery gets much harder.
On iPhone, go to Settings, tap your name, then Sign-In & Security, then Two-Factor Authentication. Under the list of devices and numbers, tap Add a Trusted Phone Number. You can add a partner's phone, a spouse's, or a second line you control. Remove old numbers you no longer have access to from the same screen, because a dead number on file is a recovery dead end.
Check this list once a year, and definitely after you change carriers or get a new number. The day you are locked out is the worst day to discover the number on file belongs to a phone you sold two years ago.
Get a verification code when you are offline
When you are online, you almost never have to go hunting for a code. You start a sign-in, and the six-digit code appears on your trusted iPhone, iPad, or Mac on its own. Tap Allow, read the number, type it in.
Offline is where people get stuck, and Apple changed how this works. In iOS 18 and iOS 26, the manual Get Verification Code button no longer shows up under Sign-In & Security when your iPhone has a connection, because the code already gets pushed to your trusted devices automatically. The button now appears only when the phone itself is offline. To force a code, turn on Airplane Mode, open Settings, tap your name, then tap Sign-In & Security. A panel reading Account Details Unavailable appears, and from there you can tap Get Verification Code.
If you have no trusted device handy at all, on the sign-in screen look for Didn't Get a Code or Can't get to your devices, then choose to have a code sent to your trusted phone number as a text or a call. One small gotcha: if you filter unknown senders in Messages, the text can land somewhere you do not notice it, so keep notifications on for those.
Set up a Recovery Key (and why it cuts both ways)
A Recovery Key is a 28-character code that you, and only you, hold. With it, plus a trusted phone number and an Apple device, you can get back into your account if you are ever locked out. It is the strongest option Apple offers, and it is off by default.
Here is the part that matters most. The moment you turn on a Recovery Key, you switch off Apple's standard account recovery process. That means Apple can no longer help you back in through the normal channel. If you lose your password, lose access to your trusted devices, and lose or never wrote down the key, you are locked out permanently. Not for a few days. Permanently. There is no support call that fixes it.
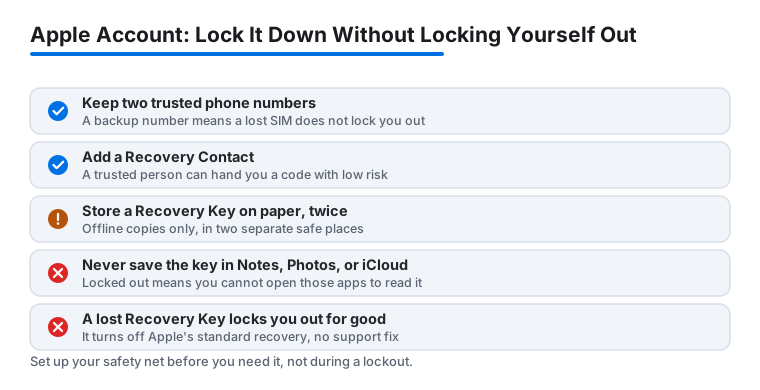
So a Recovery Key only makes you safer if you store it somewhere you will actually find it later, and somewhere an attacker cannot. Apple is blunt about where not to put it: do not save it in your Passwords app, iCloud Photos, Notes, or iCloud Drive, because if you are locked out of your account you cannot open any of those to read it. Write it on paper. Keep a copy in a fireproof box, a safe, or with a trusted family member. Two physical copies in two places is not overkill.
To set it up on iPhone, go to Settings, tap your name, then Sign-In & Security. You may need to enter your password. Tap Recovery Key, tap Continue, and follow the steps. On a Mac, open the Apple menu, go to System Settings, click your name, then Sign-In & Security, click Recovery Key, enter your Mac password, click Turn On, then Use Recovery Key. You need iOS 14, iPadOS 14, or macOS Big Sur or later.
Add a Recovery Contact for a softer safety net
If a Recovery Key feels like too much rope to hang yourself with, a Recovery Contact is the gentler option. This is a person you trust, a partner, a parent, a close friend, who can generate a recovery code for you when you are trying to get back into your account. They never see your data or your password. They just hand you a code that proves a real human you know is vouching for you.
On iPhone, go to Settings, tap your name, tap Sign-In & Security, then Recovery Contacts. Tap Add Recovery Contact and follow the steps. People in your Family Sharing group can be added straight away. Anyone else gets an invite through Messages that they have to accept.
A few rules. Your contact needs an Apple device on iOS 15, iPadOS 15, or macOS Monterey 12 or later, both of you need to be over 13 (the exact age depends on your country), and both need iMessage on. You can name up to five Recovery Contacts. Pick people who answer their phone and who you will still be on good terms with next year.
Keep your trusted devices clean
Every iPhone, iPad, and Mac you have signed into with your account and a passcode is a trusted device. Each one can show verification codes, which is convenient and also a small risk. An old iPad you gave to your kid is still a trusted device until you remove it.
To review the list on iPhone, open Settings and tap your name. Scroll down and you will see every device signed into your account. Tap any one to see details, and tap Remove from Account for hardware you no longer use, have sold, or have given away. Do this before you sell or trade in a device, not after. A trusted device in a stranger's hands is exactly the situation 2FA is supposed to prevent.
Recover a locked-out Apple Account
Say the worst happens. You forgot your password and you do not have a trusted device in front of you. What you do next depends on what you set up earlier.
If you have a Recovery Key, use it. With the key and a code sent to your trusted phone number, you can reset your password and get straight back in. If you have a Recovery Contact, reach out and ask them to generate a recovery code for you, then enter that code to reset your password. Both routes are fast.
If you have neither, you fall into account recovery, the standard process. Start it by trying to sign in on a device, or go to iforgot.apple.com and choose to reset your password. Then you wait. Apple sends a confirmation within 72 hours telling you when access will be restored, and the full wait can run several days or longer depending on what you can prove about the account. This delay is deliberate, to stop a thief from rushing in. Calling Apple Support will not speed it up, and Apple says so plainly. One warning: do not keep trying to sign in on other devices during recovery, because using your account elsewhere can interrupt, delay, or cancel the process.
A simple plan that avoids the worst outcome
If you only do one thing, add a second trusted phone number and a Recovery Contact. That gives you a real way back in without the all-or-nothing risk of a Recovery Key. Most people are better served by a Recovery Contact than by a key they might lose.
If you do want a Recovery Key, for the stronger protection, then write it down twice, store both copies offline in different places, and accept that the responsibility is now entirely yours. The key is genuinely safer against attackers. It is also genuinely unforgiving if you are careless. Choose the option that matches how organized you honestly are, not the one that sounds the most secure.
FAQ
Can I turn off two-factor authentication after enabling it?
Usually not. Once two-factor has been active on your Apple Account for a couple of weeks, Apple removes the option to disable it. If you only just turned it on, you may have a short window to switch it off from the email Apple sends you, but plan around keeping it on for good.
What is the difference between a Recovery Key and a Recovery Contact?
A Recovery Key is a 28-character code you hold yourself, and it turns off Apple's standard recovery, so losing it can lock you out permanently. A Recovery Contact is a trusted person who can generate a code to help you back in, with much less risk if something goes wrong. The key is stronger against attackers, the contact is more forgiving.
How long does Apple account recovery take if I am locked out?
Apple confirms within 72 hours when your access will be restored, and the full wait can be several days or longer depending on what account details you can verify. The delay is intentional, and contacting Apple Support cannot shorten it. A Recovery Key or Recovery Contact lets you skip this wait entirely.
Where should I store my Recovery Key?
On paper, offline, in at least two safe places like a home safe and with a trusted family member. Do not store it in your Passwords app, iCloud Photos, Notes, or iCloud Drive, because if you are locked out you cannot open any of those to read it.
How do I get a code if my iPhone has no signal?
Turn on Airplane Mode, open Settings, tap your name, then Sign-In & Security. A panel reading Account Details Unavailable appears, and you can tap Get Verification Code. When you are online, the code is pushed to your trusted devices automatically instead.
How many trusted phone numbers and Recovery Contacts can I have?
You need at least one trusted phone number and can add more, which is wise as a backup. You can name up to five Recovery Contacts. Each contact needs an Apple device on iOS 15, iPadOS 15, or macOS Monterey 12 or later, with iMessage turned on.