
Maximizing Your Privacy With Brave on iPhone and iPad
After living inside Brave on both an iPhone 15 and an iPad Air for about a month, we came away genuinely impressed by how much it blocks out of the box, and a little frustrated by a couple of quirks nobody warns you about. If you are tired of ads chasing you around the web and want a browser that treats privacy as the default rather than a buried setting, this is our honest, hands-on walkthrough of getting Brave running, tuning it, and knowing where it falls short. One thing up front: this is the iPhone and iPad app we are talking about. Brave also makes a Mac version, but the mobile app behaves differently in a few important ways, and we will flag those as we go.
Getting Brave running on your iPhone or iPad
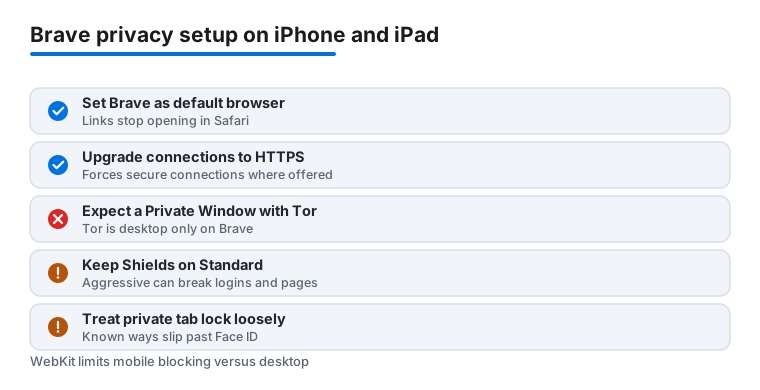
Installation is the easy part. Grab Brave from the App Store on your iPhone or iPad, open it, and you are browsing within seconds. It runs on iOS and iPadOS 16 and later, so almost any device from the last several years will take it. There is no account required, which we appreciated. The first thing we did was make Brave the default browser, because otherwise every link you tap in Mail or Messages still opens in Safari. Open the iOS Settings app, scroll down to Brave, tap Default Browser App, and pick Brave. On the iPad it is the identical steps, just roomier.
Now a caveat about bookmarks, because the older advice here is wrong. On iPhone and iPad, Brave cannot reach into Safari and pull your bookmarks across with one tap the way the desktop versions can. Apple sandboxes that data. The actual process is a two step move: in Safari (easiest done on a Mac, or through the Files workaround on iOS) you export your bookmarks to an HTML file, then in Brave you tap Menu > Bookmarks > Import, which opens the iOS Files app so you can pick that HTML file. It works, but it is clunky and worth knowing before you assume your tabs and favorites will just appear.
One more detail that shapes everything below. Apple requires every browser sold in most regions to use the WebKit engine, the same core that powers Safari. So Brave on iPhone is rendering pages the same way Safari does underneath. What you are really getting is Brave's privacy layer bolted on top, not a wholly different browser. That matters for managing expectations, and we will come back to it.
The Shields that actually do the heavy lifting
Brave Shields is the headline feature, and in our testing it earned its keep. Tap the lion icon in the address bar on any site and you see a live count of trackers and ads blocked. On a typical news page we watched it knock out dozens of trackers without us touching anything. Pages loaded faster too, which is the pleasant side effect of not downloading a pile of ad scripts. Brave claims up to three times faster loads from this; in practice we noticed it most on heavy, ad-stuffed sites and barely at all on lean ones.
Here is where a few minutes pays off. Open the global Shields settings by tapping Menu > All Settings > Shields & Privacy, or by tapping the lion icon and choosing the option to change global defaults. Review these:
- Trackers and ads blocking: leave this on Aggressive if you can tolerate the occasional broken layout. Standard is the safer everyday choice and what we ran most of the time.
- Block fingerprinting: this makes it harder for sites to build a profile of your device from things like screen size and fonts. Keep it on Standard. The strict setting can break some pages.
- Upgrade connections to HTTPS: turn this on so Brave forces secure connections wherever a site offers one.
- Block scripts: heavy handed. We left it off globally and only flipped it on per site for the sketchy ones, because blocking all scripts breaks most modern pages.
The useful part is that Shields works per site. If a page breaks, tap the lion and dial protection down for that one site without weakening your defaults everywhere else. We did this a handful of times on banking and ticketing pages and then forgot about it.
Worth saying plainly: Shields blocks trackers, but it is not a VPN. Your internet provider and the network you are on can still see which sites you connect to. Brave does sell a paid VPN add-on, billed separately through your Apple subscription, if you want to close that gap, but it is a real recurring cost and not part of the free browser.
Practical tips we wish we had known on day one
A few habits made Brave click for us. First, understand what private browsing on the iPhone and iPad version actually offers, because this is where a lot of writing online gets it wrong. Brave gives you regular Private Tabs that do not save history or cookies once closed. It does not offer a "Private Window with Tor" on iOS. That Tor routing feature exists only on the desktop versions of Brave for Mac, Windows, and Linux. People keep asking for it on iPhone, and as of mid 2026 it still is not there. If you genuinely need to route traffic through Tor on an iPhone, you would use a dedicated app like Onion Browser instead. We mention this because believing you are on Tor when you are not is the kind of mistake that matters.
Second, lock down those private tabs. Go to Menu > All Settings, find the Tabs section, and tap Close Tabs. You can set private tabs to close when you leave the app, or keep them open but require Face ID or Touch ID to reopen them. We used the Face ID option. One honest caveat: there are known ways to slip past that lock, for example long pressing the new tab button to jump straight into a private tab, so treat it as a privacy nicety rather than a vault.
Third, if the Brave Rewards prompts annoy you, switch Rewards off entirely under Menu > All Settings > Brave Rewards. It is fully opt in, and the browser loses none of its blocking muscle without it. The Leo AI assistant and the Playlist media feature are both on the iPhone and iPad app now if you want them, but neither is required and both can be ignored. For locking down the Google services you still rely on alongside Brave, our guide to Google apps privacy settings on iPhone pairs well with this setup.
The limits and rough edges to expect
We want to be straight with you, because Brave is not flawless. The WebKit requirement we mentioned means Brave on iPhone and iPad cannot block ads as completely as the desktop version, and some trackers slip through in ways they would not on a Mac or Windows machine. It is still a clear step up from a stock browser, but it is not airtight, and anyone telling you mobile Brave is bulletproof is overselling it.
We also hit the occasional broken site. Aggressive Shields settings sometimes hid buttons or broke logins, especially on banking and ticketing pages, which sent us hunting for the lion icon to loosen things up for that site. Sync between devices worked for us, but the setup uses a sync code or QR scan rather than a simple login, and it felt fiddly the first time. The bookmark import through an HTML file, covered earlier, is the other friction point worth repeating. And while Brave Search has matured a lot as the built in default, we still swapped back to another engine now and then for very local or obscure queries where the results felt thin. None of these are dealbreakers, but they are real, and you should know them before you commit.
Good alternatives if Brave is not your fit
Brave is our top pick for most people who want privacy without much fiddling, but it is not the only road. If you live deep in the Apple ecosystem, Safari with iCloud Private Relay and Intelligent Tracking Prevention is genuinely solid and needs almost zero setup, though Private Relay rides along with a paid iCloud+ plan. If your priority is search privacy above all, the DuckDuckGo browser is friendly and light, though it blocked a little less aggressively than Brave in our side by side checks. Firefox Focus is another we reach for when we want a disposable, wipe-it-every-time approach to browsing.
Privacy is bigger than a browser, of course. A good authenticator app closes one of the larger gaps in your security, and we walk through one in our breakdown of the benefits of using Google Authenticator. For the full shortlist of tools we trust, browse our roundup of the best security and privacy apps for iPhone, or explore everything in our Security and Privacy hub.
FAQ
Is Brave actually safe to use on an iPhone?
Yes. In our testing Brave reliably blocked trackers and ads, forced secure connections, and kept private sessions contained. It is built on the same WebKit engine Apple requires of every iOS browser, so it is as stable as Safari, with a privacy layer added on top.
How do I make Brave my default browser on iPhone or iPad?
Open the iOS Settings app, scroll down to Brave, tap Default Browser App, and select Brave. After that, links from Mail, Messages, and other apps open in Brave instead of Safari. The steps are identical on iPad.
Does Brave on iPhone have a Private Window with Tor?
No. The Tor private window is a desktop-only feature in Brave, available on Mac, Windows, and Linux. The iPhone and iPad app offers regular Private Tabs that do not save history, but they do not route through the Tor network. If you need Tor on an iPhone, use a dedicated app such as Onion Browser instead.
Does Brave block ads as well on iOS as it does on a computer?
Not quite. Because Apple mandates the WebKit engine, Brave on iPhone and iPad cannot strip out every ad and tracker the way the desktop version can. It still blocks the large majority and speeds up page loads, but some trackers can slip through.
What is Brave Rewards, and do I have to use it?
Brave Rewards is an optional program that lets you earn tokens for viewing privacy respecting ads. It is entirely opt in. We switched it off under Menu, All Settings, Brave Rewards, and the browser kept all of its privacy protections, so feel free to ignore it if the prompts bother you.